Too much software is available worldwide for creating the best photo, but experts recommend Adobe Photoshop for this photo work.
Every person needs a passport size photo for various work such as online form filling, passport, ID card, etc.
For this reason, we will give you the best guide for creating a passport size photo at your home quickly and easily.
You can also check some unique backgrounds from the reverse image search to choose the best experience for your image.
For free reverse image search, you must check our guide about how to do a reverse image search. You can create a passport size photo without a watermark easily.
Sometimes you have a photo for your project, and you want to remove the watermark from the images, then you use an online watermark remover tool suggested by TechSpunk.
We can start a step-by-step procedure to simplify the passport-size photo without further delay.
Now you can remove the background from the picture; check out our 13 ways to make a transparent background of the picture.
Table of Contents
3 Easy Ways to Make Passport Size Photo
1. Passport Size Photo (in Pixel in Inch)
You can create any photo in pixel or inch size. But most of the photographers used inches for making a photo.
Because the photographer knows much about the inch size, we recommend you use inches to make any photo via PhotoShop.
2. Create a Passport Size Photo (Manually)
To create a passport size photo, go to the File menu and click on the open option. Now you need to open that photo you want to work on.
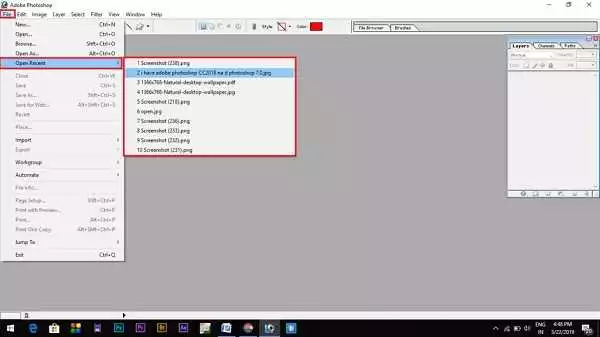 Not every photo you click needs to look good, so we need to adjust it to make a photo better.
We don’t have many words to explain every tool in this article; that’s why you can check all tools manually. We can use only important tools for making passport size photos in PhotoShop.
Now you need to go on the below path:-
Go to image> adjustment > curve tool (Shortcode M), and a curve tool will open.
A. Curve Tool (Make The Photo Lighter or Darker)
If you check, you will find many options in this tool. Every option has its importance. The first option is preset; you can check the preset option in the curve tool.
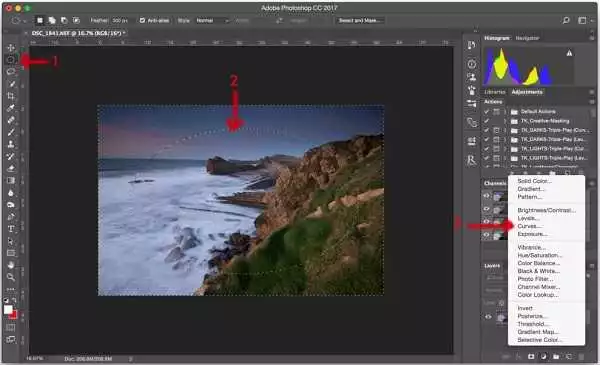 There is the next option channel; this option is significant for all beginners or professional artists. Choose RGB(Red, Green, Blue) to make your photo brighter or darker.
Now move the curve tool to make your photo brighter or darker as per your choice if you like to give your photo the feel of red, blue, or green color.
You need to change the channel mode from RBG to Red, Green, or Blue as per your requirement and finally move the curve tool as required.
Check below-mentioned the path to use:
Go to image > adjustment > Brightness/Contrast
You can use this option to make your photo brighter or darker.
B. Level Tool
We use this level tool for shining the photo.
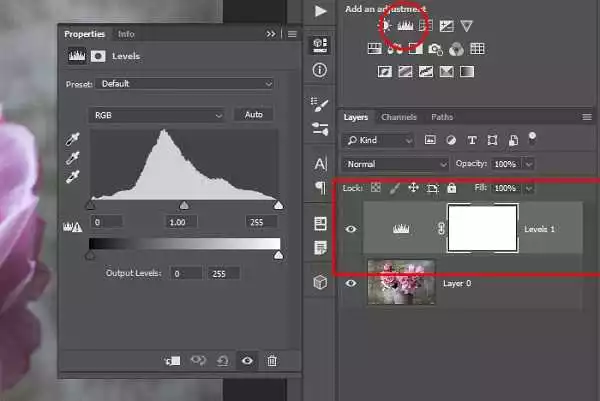 Go to image> adjustment > level.
Now the Level tool will open to create your photo shiner more than before because the Level tool is used for shining the photo in PhotoShop.
C. Crop Tool
Now go to the crop tool (Shortcode C) to crop your photo in passport size. Enter the width of 1.2 cm and height of 1.5 cm, and make sure your resolution is 300 in the open bar.
If the resolution is below 300, then enter 300 in the resolution. You can get the options bar on the top side. Now go to the File menu again and click on the new file.
 A new file dialogue box will be open. It’s time to enter your photo paper size. Most people used passport size photo dimensions such as 2×2, 4×6, 5×7, 8×10, etc.
So you can choose the photo size you need for work and click ok.
(If you choose 4 x6, 8 x 10 paper sizes, skip this step.)
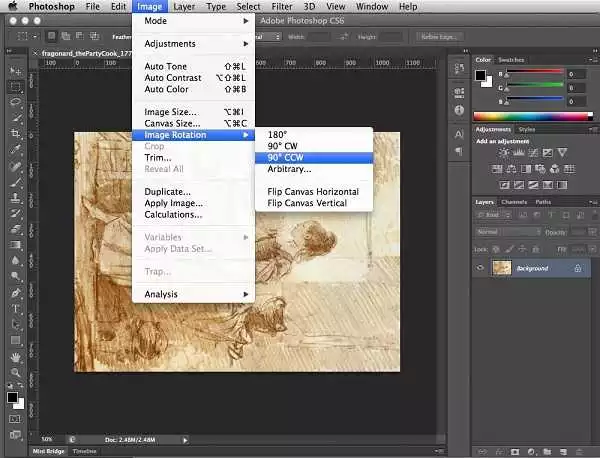
Go to image > image rotation > 90-degree CW
Now, you must copy your created image or move by drag and drop function into your newly created page. Move your image to the top right corner.
Now copy your image and paste it multiple times. (You can hold the Alt + mouse left-click button to copy this image.)
Repeat this step to make 15 copies on the single photo page.
3. Make a Passport Size Photo (Automatically)
Every person likes the faster and time-saving task for each process or work. Also, taking passport size photos regularly is much more hectic.
So you can automate the process with just a few simple clicks. Open your photo and crop it.
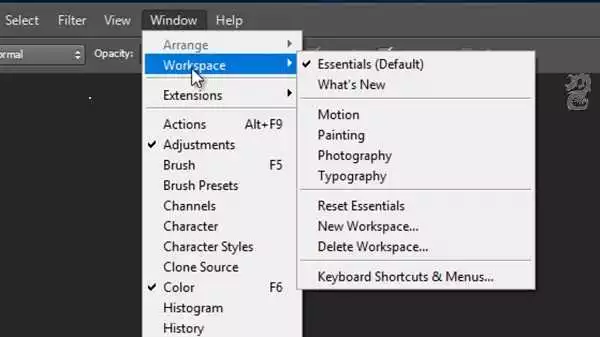 Go to Window> workspace > reset workplace.
In the latest PhotoShop version, the name change to reset workspace to reset essentially.
Now see that in PhotoShop right-side box with the history and action tab; if you do not find it, do not worry.
Go to Window and click the action tool (Short Key Alt + F9).
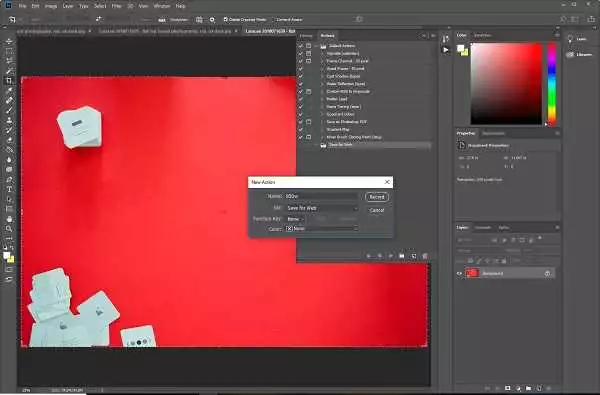 After getting the history or action tab, you need to click on the new action icon in the action tab. Now, a new action tab will be open.
Write any name in the name; We write passport size photo action, and now you can set your function key. After clicking on the record button, create your photo manually.
Now, click on the stop button, and your work will record. For your future work, make sure you can use the short key whenever possible; it will help you in the future.
Time to create passport-size photos within just seconds or minutes(Quickly).
I repeat all processes as a summary, crop your photo again, and press the shortcut key you use for action; your photo was created automatically. You can also save and open saved actions for future use.
In the action tab, select your action from the top right side. You will see a down arrow icon and many options; click on the down arrow icon.
Just click on save action and press ok. You can also load your action from these same techniques.
Frequently Asked Questions
Q. How Do You Create a Stamp or Ticket Size Photo?
Ans: You don’t need to create fundamental steps again for ticket-size photos. You need to change the crop size of the photo.
Write 0.7 in width and 0.9 in height; as we mentioned, the resolution is 300. Now crop the photo and use the same techniques.
Q. How to Create Passport Size Photo Using Automate Command?
Ans: I like the automated command option because this option will create photos automatically, and you don’t need to do anything manually.
Automate work with lots of tools to take your task completely easy.
We can give you little detail one by one.
1. Batch
In case you want to create 20 or higher than 20 number passport-size photos very urgently. If you do this work step by step, it consumes a lot of time.
So let’s find a solution for that step by step.
2. Photoshop Batch Dialogue Box
Initially, you must create a new folder and paste all your photos.
Go to file> Automate> batch and open the PhotoShop batch dialogue box.
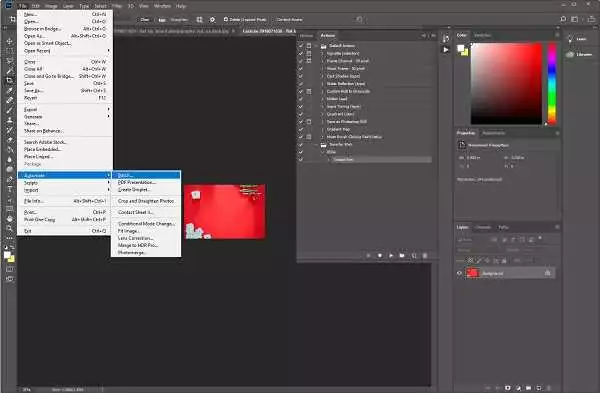 You must select the action you created above to take photos automatically. After that, like the source as the folder, click Choose a folder, select your folder, and click ok.
Now you can choose the destination; you have three options for the destination.
- None – If you choose this None option, the photo will be created and saved individually.
- Save and Close – If you choose this option, your photo will create and save automatically.
- Folder – If you choose this option, your photo will be saved in a folder. But it would help if you wrote some extension name for keeping it. After that, click on Ok.
3. Contact Sheet II
With this contact sheet, you can easily create your photo with the caption, but how?
So the answer is…
Go to Automate > Contact Sheet II, A contact sheet dialogue box will be open.
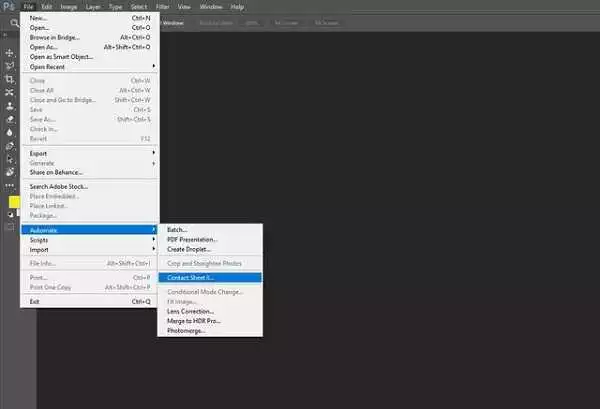 Click on the browse button and choose your photo folder. (If you have multiple folders in one folder, click on include subfolder)
Choose your width, height, resolution, and mode RGB in the document section.
If you want to use the caption, click on use filename caption; otherwise, leave it. Your contact sheet will be ready within a minute.
4. Picture Package
This picture package is a great tool, but I don’t know why PhotoShop removes this option from the latest version.
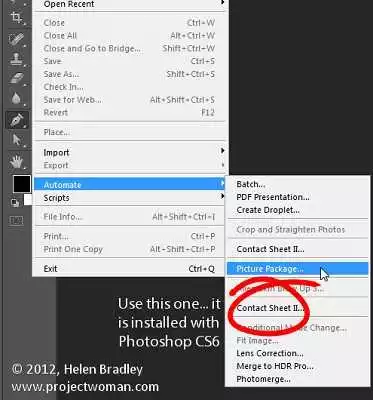 If you like this option, use PhotoShop 7.0 or an older version. Yet you tell him his work and its usage below.
Go to automate > picture package; a package dialogue box will open.
You can choose a source file or folder, click the browse button and select the file or folder; I think files are good for the picture package.
Under the document section, you can choose the page size, layout, resolution, and mode according to your requirement.
Do you want to use the label on your photo? If yes, then do the below steps:
Label your photo under the label section > click ok. Your picture package will be ready in a few seconds.
Final Words
So what do you think? Creating passport-size photos in PhotoShop easy or not? Tell me your answer via comment. Also, if you have any doubts, please ask questions in the comment section below.
You may upload your created photo to the Instagram account. Also, you may check how to check the private Instagram profile easily.


